Tuesday, August 12, 2014

Replicating a pair of Jeweled heeled 1920's shoes.


For Costume College this year I knew I needed to have fabulous shoes to go with my Gala dress. I couldn't put all that work into beading the dress and have boring shoes. So after some research, I drew my inspiration from this image.

Jeweled heels ca. 1925 via The Kyoto Costume Institute
I also used these tutorials as a guide: How to paint your own 1920s flapper shoes.
                                                           Dramatic Threads

I started with the "23 Skidoo" Spectator T-Strap Shoes (White)  as my base.

I chose these shoes because they were white and the right shape. When you're searching for shoes to use in this tutorial, I recommend finding one with the right shape since the color can be altered. The first thing I did was tape off the inside of my shoes. Even though people will never see the insides, when they are being worn, I didn't want to muck up the dark red interior. If you aren't afraid of possible drips or smears you can skip this step.
 
Before painting you have to take off any finishes the shoe already has. I used Angelus Leather Preparer and Deglazer for this. You can get it at several places online. I ordered mine from American Duchess to save on shipping, since I was getting my shoes from there already.
The deglazer reminded me of paint thinner so I was careful not to rub to much. I made sure I went over every area 2-3 times to take the shine/finish off, but noticed if I passed over any one area to much it got a tacky feeling to it. I let that dry overnight before I taped off the areas that would be painted black. You need to be extra careful with tucking the tape under the over lapping toe and heel portions. Having to go back into the crevices with the silver to cover black paint that had dripped is a nightmare. Luckily I only had to go back in a couple spots.
If you are extremely careful you could probably skip this step. As you can see in the next picture I'm not that careful. I chose to paint my shoes with Jacquard Lumiere Acrylic paints. I've had really good results with them on fabric and seen good reviews for their use on shoes.

The black portions took two coats with a few minor touch ups wherever there were white specs. I allowed the paint to dry thoroughly before I removed the tape.

I didn't tape off any boarders for the silver portions. Touching up the smudged black portions wasn't as difficult as covering black paint with silver.

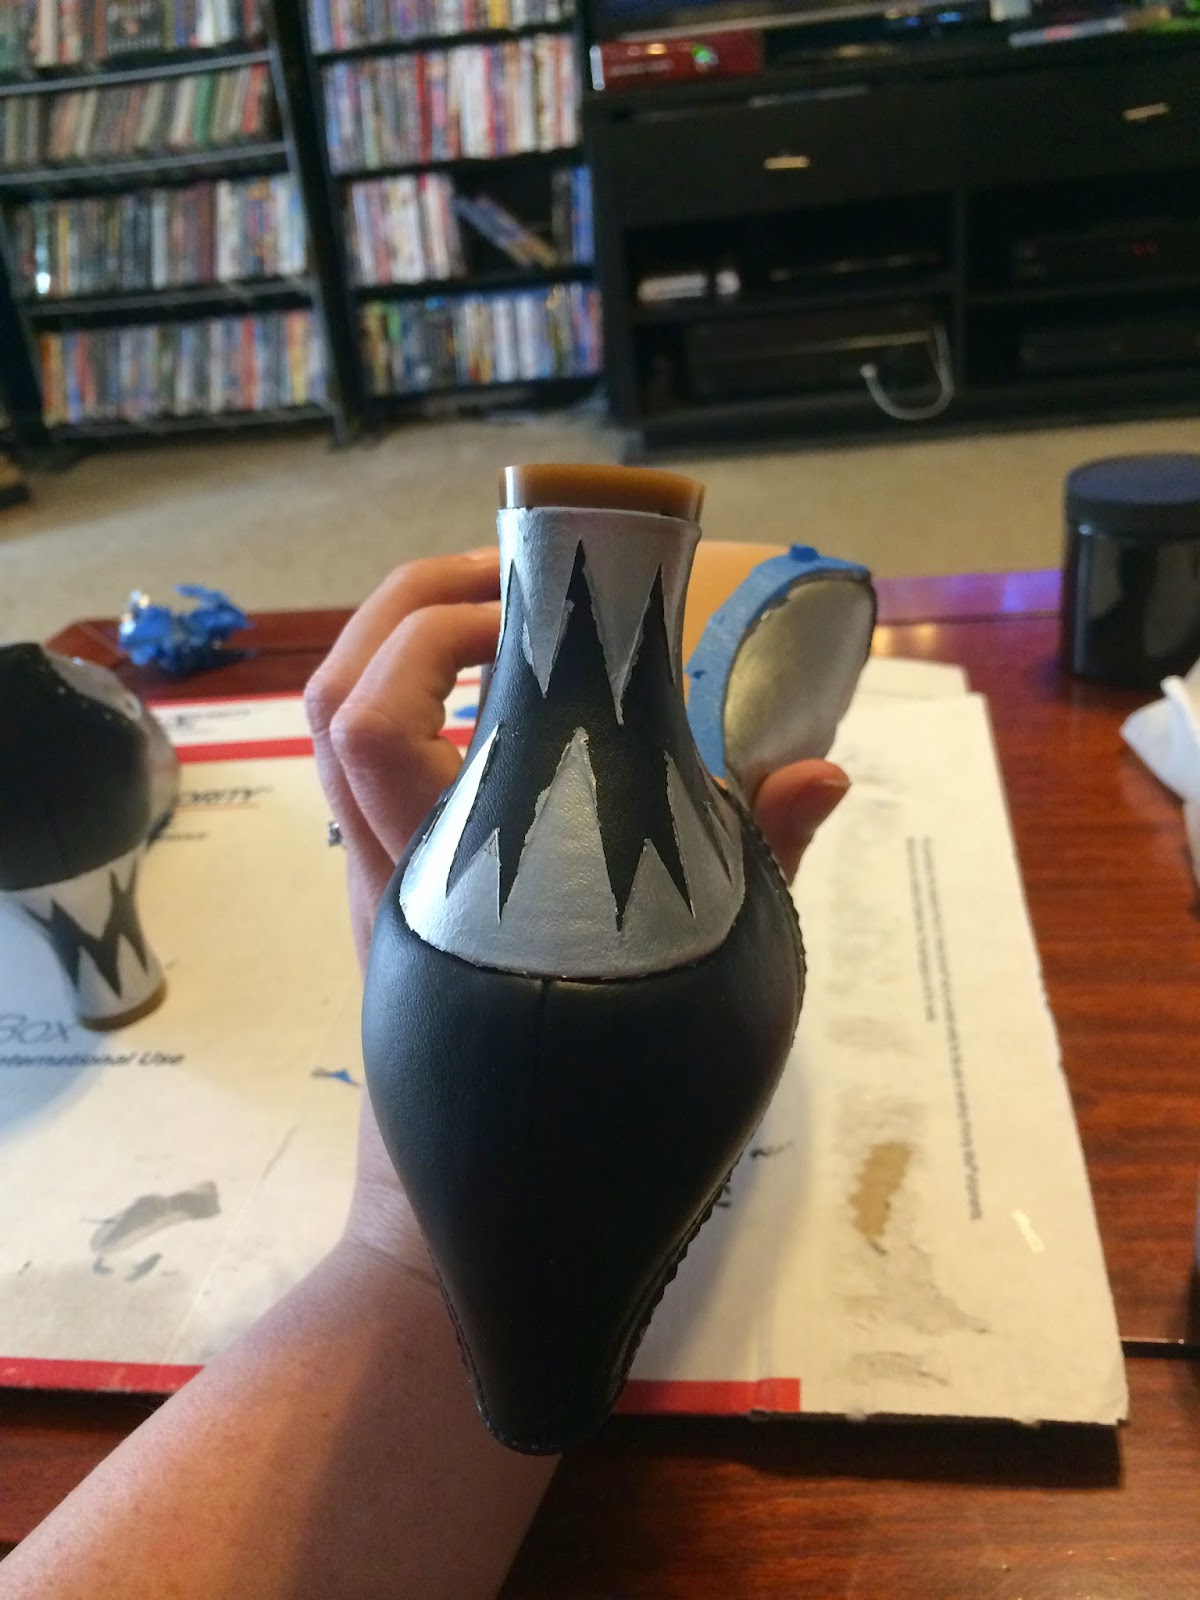
To transfer the heel pattern to the shoes I began by wrapping a piece of scrap fabric around the heel and tracing around the edges. This allowed me to have a flat pattern from a 3D shape. 


I drew the pattern I wanted to use on the fabric and then transferred that design to painter's tape via carbon paper.


Next I took an exacto knife and cut along the lines of the design. My base was already black and the spikes were going to be silver so I took the inverse of the design.


It was about here when I was putting the tape outline on the shoe that I realized a flaw in my plan. The fabric has some stretch along the bias whereas the tape doesn't. I had to fudge with the pattern a bit, by slashing and spreading it, to make it fit properly.
The silver paint required more coats to cover everything properly than black paint did. If I was to do a project like this again I would airbrush each layer so they're not as thick. This was especially apparent when I peeled the tape away.
ewwwwww
To fix the ridges left behind from the layers of paint, I used an extra fine sand paper. You want to use an extremely light hand while using the sandpaper. If you are heavy handed you will take off to much paint and possibly mess up the leather layers below. Once the layers were smooth I touched up all the lines.
MUCH BETTER!!!!!!!
Once I could convince myself I didn't need to do anymore touch ups I allowed it to dry overnight to make sure the paint was completely dry. I then applied Angelus Acrylic Finisher (Matte) over all of the painted areas.

I used 4 different sizes of Rhinestone on the heels. I attached the Rhinestone to the heels with a Swarovski crystal glue pen. It's meant to attach the crystals to Jewelry components but worked really well with this project. It also has an extremely helpful tip that makes grabbing and placing the smaller rhinestones much easier.
I found it was easier to stage the Rhinestones on my template vs. doing them one at a time. I also found it useful to put the Rhinestones on from both ends meeting in the middle. This helped with keeping the spacing between each row even.


Once you get to this stage it seems to take FOREVER, but I think a lot of that is because you are so close.
Stick with it. It's worth it I promise.

* If you do end up using this tutorial, leave a link in the comments. I would love to see what you come up with!


Monday, August 11, 2014

Motivation for fighting a Mundane Monday

Week of August 11, 2014

Mondays can often be downers. It’s the beginning of yet another work week. That’s 5 whole days before you’re free, be it to craft and create or to attend the next event. But instead of letting the weight of a new week stifle my creativity or energy I’ve collected some links to use as inspiration. I’m sharing them here to give you a little Motivation for fighting Mundane Mondays.

I'm sorry its been awhile since the last Mundane Monday. School was a little more intense then I anticipated and any energy I had to spare was put into sewing for Costume College. But I'm back with recharged batteries and bursting with ideas!

1. Costume College wrap up posts are pouring in. So many fabulous costumes!!! Wrap up posts from Lauren from American Duchess, Loren from a Costumer's Closet here, here and here, and Katherine of The Fashionable Past, make sure you follow all the links for her different costumes! Sarah at Gilded Garb, Gina from Beauty from Ashes here, here, and here, and Fresh Frippery also did write ups. You can find mine here. I know there are more out there and I love reading them so if you have a Costume College wrap up I haven't already shared, please leave a link in the comments!

2. Samatha shared her Riding Habit pictures on her blog The Couture Courtesan. Its such a perfect fit and pretty color!

3. Klaire de Lys shared her tutorial on how she did the make up for a blind seer. So many cool tips.

4. I've been waiting for close up pictures of this costume since she first introduced it. Jen Thompson shared more pictures of her Painted Empire gown this week. Can you believe she HAND painted the borders on this dress?!?!

5. On my sewing to-do list is Anna's green ball gown from the movie Frozen. 

I'm not sure if I will ever be happy with it if I don't embroider it. If I am able to compromise this Spoonflower fabric might be perfect.

6. Truly put a padded hem tutorial on her blog Truly Hat Blog. I'm always looking for an alternative to the standard fold over twice hem.

7. I enjoyed seeing Samantha's 1820s costume up close and in person at Costume College. It is indeed a quirky era but I loved everything about it, from her fabric choice, the cap, and her shoes.

8. Comic Con hosted their first Geek Couture Fashion show. Her Univerise Fashion Show, there are several sites that mention the fashion show but I feel this is one of the better ones. If you want to see more do a goggle search of Her Univerise Fashion Show.

9. Angela just finished her beetle wing embroidery gown. She has lots of detail in progress shots on her Facebook Walking Through History community page.

10. Another tutorial for the bodice on Elsa's dress in Frozen.

11. Kendra's 18th century hair book is out! It is even better then I ever imagined it would be. LOTS of photos and tips. 

Have a creative week!

Sunday, August 10, 2014

Costume College 2014

My one big event each year, that all my costuming revolves around, is Costume College. In this one event I learn all sorts of new things, I am inspired by almost every costumer around me, I catch up with old friends, meet new people, and I get to play dress up all weekend long. I'm not sure there is much more I could ask for out of an event.

This year my Costume College vacation started after I completed my last final for the Summer semester. Despite needing the full class time for my final, an accident and the resulting traffic we got to the fabric district around 1300. I have a love-hate relationship with the fabric district. I love all the fabrics that can be found but hate the process of finding them. That process is always extremely draining to me. This year was no different but I did find a few perfect fabrics for a couple projects I have planned
The brown and beige wools are going to become a bicycling outfit.
The navy blue fabric is a nice lightweight linen. I don't have specific plans for it yet, but I think it would work well for Ren faire.
The lilac colored silk taffeta is for my next big project, a Game of Thrones dress.
I also found two feathers that have no purpose but to look pretty with.
Costume College's official start is Thursday with registration and the pool party. I decided against wearing anything because of how drained I was feeling.
Friday I re-wore my chemise gown from last year. It was probably the best choice I could of made because its easy to wear, and I was still wiped out from the day before.
A first for me this year was teaching at Costume College. I taught a class on how to make Death head buttons. I know I was visibly shaking I was so nervous but I had a lot of positive feedback. It was worth the anxiety for me when at the end of the class a couple different students approached me with their completed buttons.

 If you were in the class and have any suggestions I would love to hear them. It was requested of me during the class to put my class info online. My goal is to have a tutorial up as soon as possible.

For the Ice Cream social I was going to wear Captain America again but decided against it. I was hot and wore out by that point, and knew if I took one costume off I wouldn't be putting on another. Thankfully my friends rock and they helped me re-accessorize my wig so I had a different evening look.

During the day on Saturday I again chose not to wear a costume. The heat really got to me this year! I know it was the best choice though. I was able to recharge my batteries, attend a couple classes and enjoy the Gala without feeling tired. 
I wore Phase 1 of my Robe de style to the Gala. I really like this dress and cannot wait to finish it. I think one of the best parts of wearing this dress is taking pictures with the other Robe de Style wearers.  I'm crossing my fingers that the pictures that were taken on the vintage Brownie camera come out. How cool would that be?!?!?!?
Photo from Gina White
 
I finished out Costume College on Sunday by wearing my Victorian Explorer costume. I'm glad I postponed wearing it. It felt at least 10 degrees cooler that day. I also had two limited classes so I was off my feet for most the day. 
Photo from Gina White
This year I did extend my vacation a few days to spend more time with friends and visit some of the local museums.
Now that I have finally caught up on sleep and most of my stuff has been put away I am left with the ideas and inspiration that Costume College always brings. Stay tuned! I plan to get started soon.