Monday, December 29, 2014

Regency Corset

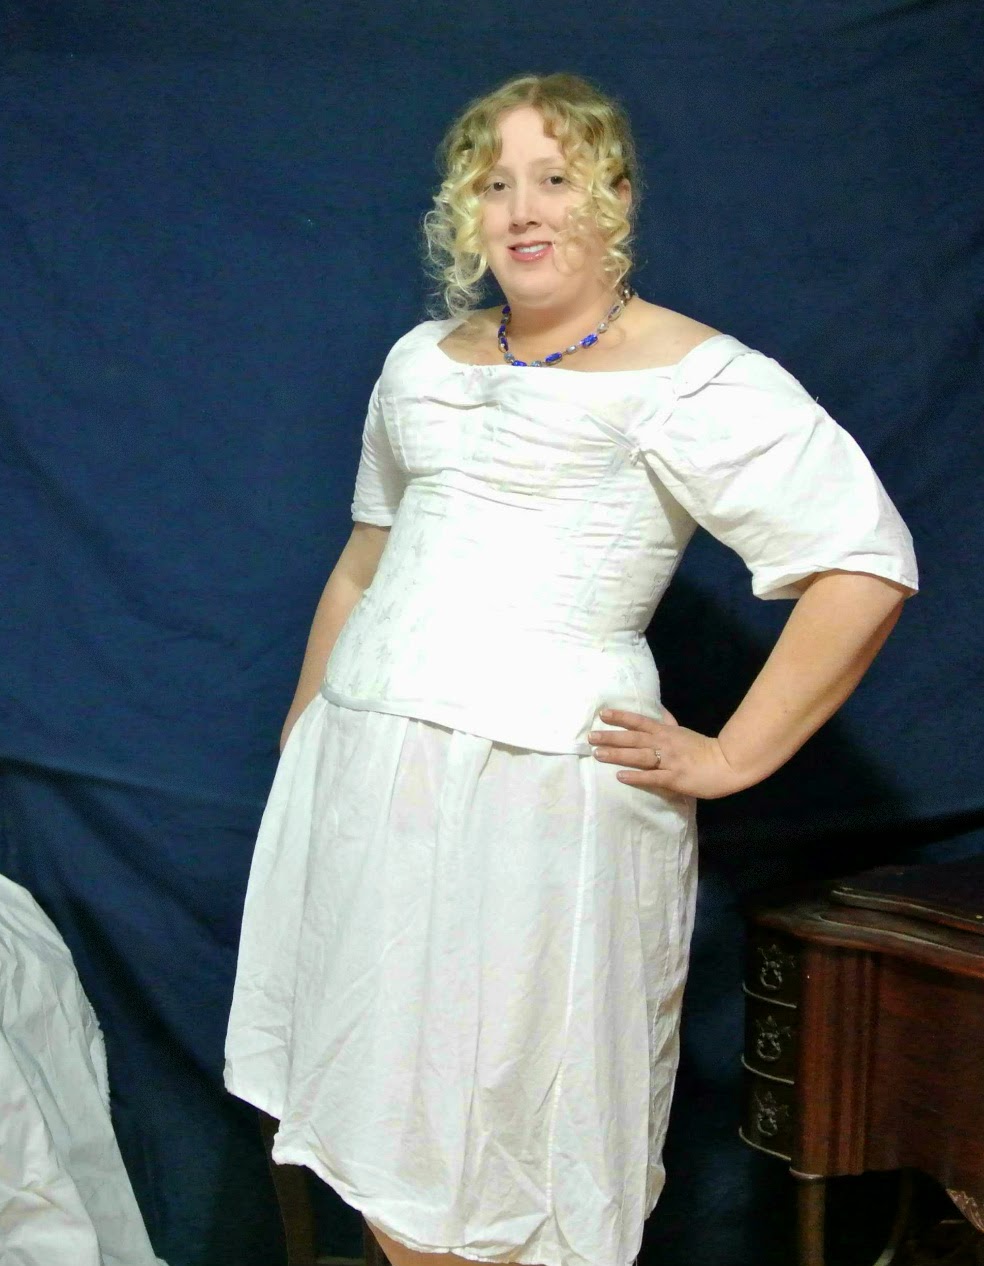
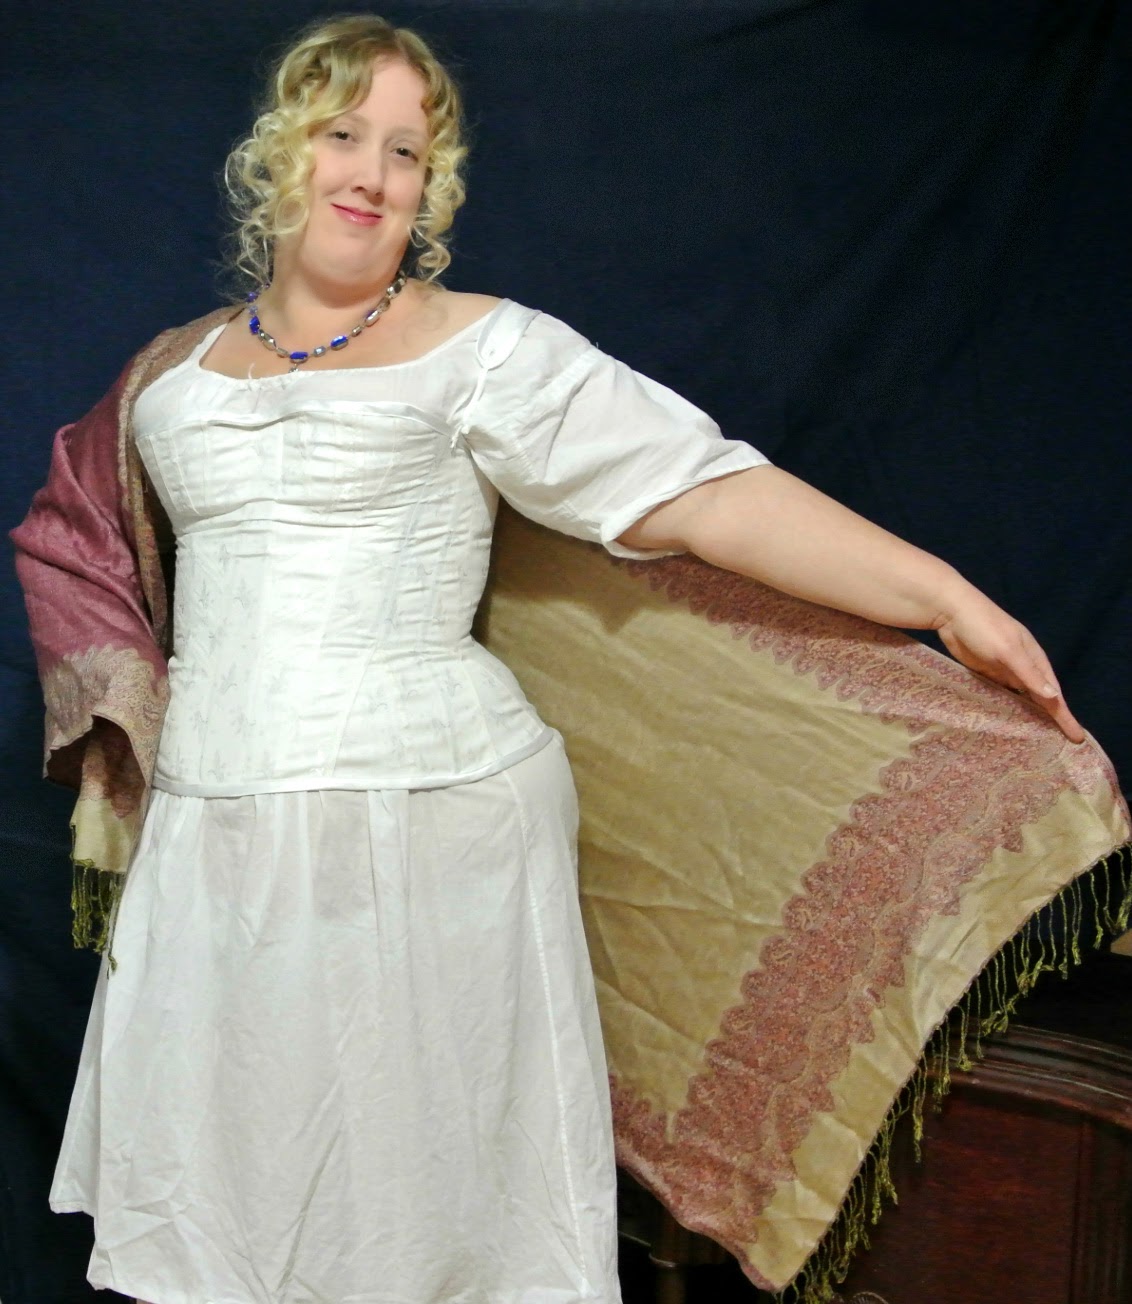
My first project completed after my long sewing hiatus, was a Regency Era Corset. I have big plans for a year filled with Regency events, but I can't make the gowns until I have the proper undergarments.
I used a custom drafted pattern from Red Threaded on Etsy. I had heard great reviews from others who had used her patterns. I was told to skip the mock up because the custom patterns went together so fast and smoothly I wouldn't need the mock up. It ended up being good advice. The pattern comes clearly marked, with easy to follow instructions. I have always struggled with sewing in gussets but following the patterns instructions these gussets went in smoothly. I plan to use this method from now on.

I could have easily finished this corset in a day if I hadn't done my eyelets by hand or had to wait for my boning to arrive in the mail. The only complaint I had with the fit of this pattern was how it bunched in the bust. But a testament to how good the customer service is at Red Threaded, the owner saw a comment I made about the bunching and offered trouble shoot if I sent her a picture. I'll update later with the results after I implement her suggestion. If I'm honest though, I can live with the bunching. Being plus sized and pear shaped, corsets are evil.
The only changes I made from the pattern was to add the diagonal boning channels, and used a machine embroidery stitch over several of my stitch lines. I was trying to make it look a tad fancier because I had visions of pretty embroidered ones.

Maybe for the next one I will attempt a true embroidered and corded corset. 


Thursday, December 4, 2014

Vernet's 1814 Merveilleuses and Incroyables

I enjoy Historical costuming for several reasons. The obvious reason is it allows me to dress up and pretend I am a pretty pretty princess. I also enjoy it as a creative outlet. But another reason, that most people don't hear about, is the academic reason. I love history, and because of that I enjoy finding out the whos, whats, and whys of the garments I make.
Recently I was given the opportunity to join a new group.

But WHAT ARE Merveilleuses and Incroyables? 
The Merveilleuses or the Marvelous Ones (women) and the Incroyables or the Incredible Ones/Unbelievables (men) were part of an aristocratic youth (young adults) movement during the French Revolutionary War.
I already knew that the fashions during this time had taken a drastic turn. The more elaborate and ornate styles, of a century earlier, that included lush fabrics, jewels, wide skirts and over the top hairstyles were now out. This style reflected the earlier regime's extravagance that the Revolutionist were against. Instead a new style was adapted that borrowed from the simpler fashions of the past. The main influences can be seen in the flowing tunics and gowns that were worn by the Ancient Greeks.
The Merveilleusus and Incroyables rebelled against the simplicity of the new fashions. 
For the Merveilleusus their rebellious outfits went in two directions. One direction was to take the thin flowing garments that were fashionable to the extreme. The fabric of their gowns was so sheer it was transparent, and their legs could be seen through the skirts of their dresses. They often increased this "naked look by dampening the cloth of their dresses to make them cling more closely to their bodies. Many gowns displayed cleavage and were so tight the wearer would not be able to carry things in her pockets. One source said that even a handkerchief would disrupt the lines of the dress. This can be seen in many caricatures made during the time period.

Caricatures tend to show fashions in extreme but paintings done at that time,of Merveilleuses, show the same trends.

The other trend that both men and women followed were to wear eccentric clothing that was a comical exaggeration of the new simple fashions. Young men wore what was essentially a English Country Suit that had been Caricatured-ized.  fashionencyclopedia.com sums it up nicely. Men wore:
"Skintight pants with extremely short vests, often made of flowered fabric, were topped with a jacket made so long its wide flared tails reached the ankles. The coat sleeves were so long that they hid the hands from sight, and the lapels were so large they often stuck out several inches beyond the wearer. The back of the bulky coat was bunched in folds, and the front was cut to look uneven when the jacket was buttoned. The jacket collar stood up high behind the head in back, and a huge cravat, or neck covering, was wrapped so high around the neck that it covered the chin and mouth. Incroyables cut their hair raggedly, and it hung long and shaggy on the sides of their heads, in a style called "dog's ears." They wore large, two-cornered hats, carried over-sized eyeglasses, and often wore two watches."
The women's outfits were much more varied to sum up nicely in one paragraph. But starting in January of 2015 many of Vernet's Merveilleuses and Incroyable fashion plates will be coming to life. There may not be a lot of dampening of our gowns, but there is plenty of over the top caricature-ized crazy and fun gowns.
If you'd like to learn more or to follow along, you can find us on Facebook, and I promise to share all the parts I find especially intriguing in Mundane Monday links.

Tuesday, October 21, 2014

Just a brief, I'm still alive post.


8 months ago I decided to finally go back to school and try and get my degree. I mentioned a couple times how hectic I felt over the summer but that was nothing compared to this semester. I've only accomplished two creative things since the semester started 2.5 months ago. The first thing was sewing two gussets into my lab coat and the other was creating 14 death head buttons for a friend. That's it and it does make me a little sad. But it won't last forever, and I promise I will be back to a more regular posting schedule by the end of the Semster!
Things to look forward to:
1. Mundane Mondays will be back and hopefully every Monday. You all still inspire me, its just I am approximately 2 months behind on my blog reading.
2. The Death Head button tutorial is 95% done. It frustrating how close to done it is, but there are a few more pictures and details I want to make sure to include and then I need to do a final edit. SOON I promise.
3. My next big event is a Renaissance festival. I hope to have my kirtle done. No promises though, Anatomy comes first.
4. I get a kick out of dressing in Vintage styles while site-seeing. My plan is to have a new ensemble for when I go to see the Grand Canyon.
A week after that trip, my semester is over. I will have two whole months off, which I plan to fill with sewing. And I have big goals. Sleep the first week. *smirk* And then an entire Regency ensemble from the skin out. I also plan to get started on my GoT cosplay.

Monday, September 8, 2014

Motivation for fighting Mundane Mondays

Mondays can often be downers. It’s the beginning of yet another work week. That’s 5 whole days before you’re free, be it to craft and create or to attend the next event. But instead of letting the weight of a new week stifle my creativity or energy I’ve collected some links to use as inspiration. I’m sharing them here to give you a little Motivation for fighting Mundane Mondays.

Week of September 8, 2014


1. Do you use Pinterest to do research, gather inspiration or costume ideas? The Pragmatic Costumer brings up some very important points about doing your research and not automatically trusting the facts on the pin. I'll admit to having pinned the first picture myself. There was enough about it that didn't seem right so I pinned it to do further research. After I did the research I found out they were photoshopped pieces.

2. Klaire de Lys shared a real life Disney princess makeup for Rapunzel. One of my favorite parts of this post is that she shares how she created the light through the hair look in her pictures.

3. Diary of a Renassiance Seamstress posted about her Rococo Dorothy. She starts from where she got her inspiration, takes your through her entire process, and at the end she links to the group's presentation. I think the whole group was extremely clever!

4. I was impressed with the Diary of a Mantua Maker's 1670's 780lgown. This era is grossly under-represented.

5. Robin from In the Long Run showed how she made her Stephanie Brown Robin's Belt

6. Over the weekend I attended Salt Lake Comic Con. I am impressed with the amount a big name stars and quality of the panels from such a new Convention. Unfortunately they are feeling some growing pains and were NOT ready for the amount of people that did come. Hubby and I will be adding this Convention to our Con List. It may not be a yearly thing but we plan on going as often as we can.
Below are the pictures I took at the Convention. As usual so many costumes got away before I could get a picture.


Monday, September 1, 2014

Motivation for fighting a Mundane Monday

Mondays can often be downers. It’s the beginning of yet another work week. That’s 5 whole days before you’re free, be it to craft and create or to attend the next event. But instead of letting the weight of a new week stifle my creativity or energy I’ve collected some links to use as inspiration. I’m sharing them here to give you a little Motivation for fighting Mundane Mondays.

Week of  September 1, 2014

1. Samantha shared some up close ups on her Riding Habit Construction. I am interested to try the Center back seam construction where she put all 4 pieces together and sewed them at the same time. I have a feeling I will have a 'mind blown' moment.

2. Lauren of Wearing History launched her Kickstarter. I would love to see her vision come to life. I love everything about it, from the Vintage Ready to wear clothing, to a company that is trying to keep everything domestic.

3. Fashion Through History posted about the Prom dress she made for her sister. I think I like it better then the dress she used as inspiration!

4. I've had Regency on my mind lately. In my search for Sari and Shawl dresses I stumbled across this one from The Laced Angel Blog. 

5. Speaking of Regency research. I started looking into the underthings. Its been years since I last attempted anything Regency. 

Not only do I need bigger ones but my skills have increased and I want these to reflect that. I think I am going to use a combination of these two site for making a new chemise. This one and this one.

6. Peryn-wn on Livejournal shared her recreation of the Louisbourg Gown. LOTS of pictures and info on how she did it. My favorite part is her close ups of her embroidery. 

7. Dragon Con pictures are starting to roll in. I am sure there are tons more pictures out there but here are just a few sites I've found. superherohype.com, and Flickr.

8. Trystan made a book themed dress for the Costume College gala. What a fun way to show support for your friend's endeavors. 


Tuesday, August 12, 2014

Replicating a pair of Jeweled heeled 1920's shoes.


For Costume College this year I knew I needed to have fabulous shoes to go with my Gala dress. I couldn't put all that work into beading the dress and have boring shoes. So after some research, I drew my inspiration from this image.

Jeweled heels ca. 1925 via The Kyoto Costume Institute
I also used these tutorials as a guide: How to paint your own 1920s flapper shoes.
                                                           Dramatic Threads

I started with the "23 Skidoo" Spectator T-Strap Shoes (White)  as my base.

I chose these shoes because they were white and the right shape. When you're searching for shoes to use in this tutorial, I recommend finding one with the right shape since the color can be altered. The first thing I did was tape off the inside of my shoes. Even though people will never see the insides, when they are being worn, I didn't want to muck up the dark red interior. If you aren't afraid of possible drips or smears you can skip this step.
 
Before painting you have to take off any finishes the shoe already has. I used Angelus Leather Preparer and Deglazer for this. You can get it at several places online. I ordered mine from American Duchess to save on shipping, since I was getting my shoes from there already.
The deglazer reminded me of paint thinner so I was careful not to rub to much. I made sure I went over every area 2-3 times to take the shine/finish off, but noticed if I passed over any one area to much it got a tacky feeling to it. I let that dry overnight before I taped off the areas that would be painted black. You need to be extra careful with tucking the tape under the over lapping toe and heel portions. Having to go back into the crevices with the silver to cover black paint that had dripped is a nightmare. Luckily I only had to go back in a couple spots.
If you are extremely careful you could probably skip this step. As you can see in the next picture I'm not that careful. I chose to paint my shoes with Jacquard Lumiere Acrylic paints. I've had really good results with them on fabric and seen good reviews for their use on shoes.

The black portions took two coats with a few minor touch ups wherever there were white specs. I allowed the paint to dry thoroughly before I removed the tape.

I didn't tape off any boarders for the silver portions. Touching up the smudged black portions wasn't as difficult as covering black paint with silver.

To transfer the heel pattern to the shoes I began by wrapping a piece of scrap fabric around the heel and tracing around the edges. This allowed me to have a flat pattern from a 3D shape. 


I drew the pattern I wanted to use on the fabric and then transferred that design to painter's tape via carbon paper.


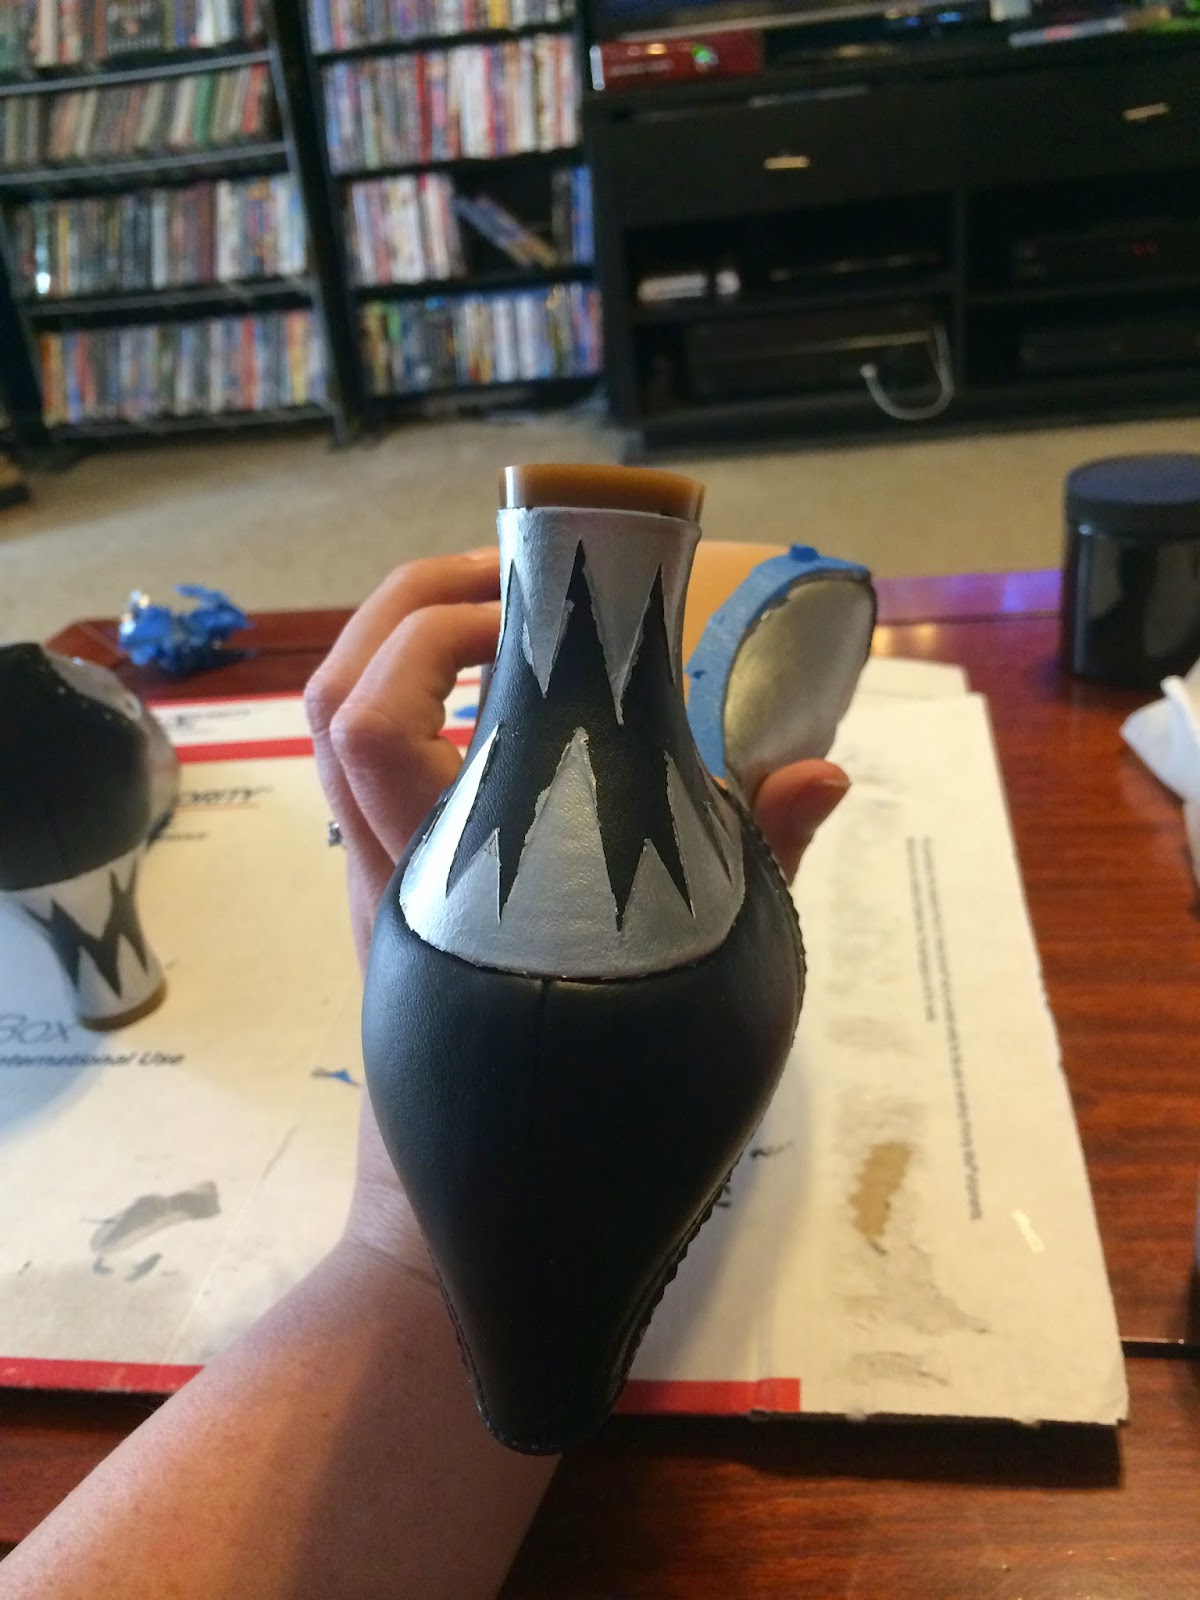
Next I took an exacto knife and cut along the lines of the design. My base was already black and the spikes were going to be silver so I took the inverse of the design.


It was about here when I was putting the tape outline on the shoe that I realized a flaw in my plan. The fabric has some stretch along the bias whereas the tape doesn't. I had to fudge with the pattern a bit, by slashing and spreading it, to make it fit properly.
The silver paint required more coats to cover everything properly than black paint did. If I was to do a project like this again I would airbrush each layer so they're not as thick. This was especially apparent when I peeled the tape away.
ewwwwww
To fix the ridges left behind from the layers of paint, I used an extra fine sand paper. You want to use an extremely light hand while using the sandpaper. If you are heavy handed you will take off to much paint and possibly mess up the leather layers below. Once the layers were smooth I touched up all the lines.
MUCH BETTER!!!!!!!
Once I could convince myself I didn't need to do anymore touch ups I allowed it to dry overnight to make sure the paint was completely dry. I then applied Angelus Acrylic Finisher (Matte) over all of the painted areas.

I used 4 different sizes of Rhinestone on the heels. I attached the Rhinestone to the heels with a Swarovski crystal glue pen. It's meant to attach the crystals to Jewelry components but worked really well with this project. It also has an extremely helpful tip that makes grabbing and placing the smaller rhinestones much easier.
I found it was easier to stage the Rhinestones on my template vs. doing them one at a time. I also found it useful to put the Rhinestones on from both ends meeting in the middle. This helped with keeping the spacing between each row even.


Once you get to this stage it seems to take FOREVER, but I think a lot of that is because you are so close.
Stick with it. It's worth it I promise.

* If you do end up using this tutorial, leave a link in the comments. I would love to see what you come up with!


Monday, August 11, 2014

Motivation for fighting a Mundane Monday

Week of August 11, 2014

Mondays can often be downers. It’s the beginning of yet another work week. That’s 5 whole days before you’re free, be it to craft and create or to attend the next event. But instead of letting the weight of a new week stifle my creativity or energy I’ve collected some links to use as inspiration. I’m sharing them here to give you a little Motivation for fighting Mundane Mondays.

I'm sorry its been awhile since the last Mundane Monday. School was a little more intense then I anticipated and any energy I had to spare was put into sewing for Costume College. But I'm back with recharged batteries and bursting with ideas!

1. Costume College wrap up posts are pouring in. So many fabulous costumes!!! Wrap up posts from Lauren from American Duchess, Loren from a Costumer's Closet here, here and here, and Katherine of The Fashionable Past, make sure you follow all the links for her different costumes! Sarah at Gilded Garb, Gina from Beauty from Ashes here, here, and here, and Fresh Frippery also did write ups. You can find mine here. I know there are more out there and I love reading them so if you have a Costume College wrap up I haven't already shared, please leave a link in the comments!

2. Samatha shared her Riding Habit pictures on her blog The Couture Courtesan. Its such a perfect fit and pretty color!

3. Klaire de Lys shared her tutorial on how she did the make up for a blind seer. So many cool tips.

4. I've been waiting for close up pictures of this costume since she first introduced it. Jen Thompson shared more pictures of her Painted Empire gown this week. Can you believe she HAND painted the borders on this dress?!?!

5. On my sewing to-do list is Anna's green ball gown from the movie Frozen. 

I'm not sure if I will ever be happy with it if I don't embroider it. If I am able to compromise this Spoonflower fabric might be perfect.

6. Truly put a padded hem tutorial on her blog Truly Hat Blog. I'm always looking for an alternative to the standard fold over twice hem.

7. I enjoyed seeing Samantha's 1820s costume up close and in person at Costume College. It is indeed a quirky era but I loved everything about it, from her fabric choice, the cap, and her shoes.

8. Comic Con hosted their first Geek Couture Fashion show. Her Univerise Fashion Show, there are several sites that mention the fashion show but I feel this is one of the better ones. If you want to see more do a goggle search of Her Univerise Fashion Show.

9. Angela just finished her beetle wing embroidery gown. She has lots of detail in progress shots on her Facebook Walking Through History community page.

10. Another tutorial for the bodice on Elsa's dress in Frozen.

11. Kendra's 18th century hair book is out! It is even better then I ever imagined it would be. LOTS of photos and tips. 

Have a creative week!