Saturday, December 8, 2012

Quilted/Folded Ribbon Ornament Tutorial


I love these ornaments because the possibilities are endless.Changing the ribbons used or your spacing can create completely different looks. 
They may look extremely complicated but truthfully they aren't. They just take some time and patience.
I was taught to make these using fabric. I took it a step further and decided to use ribbon so I could eliminate a few of the prep steps. Search the internet for quilted or folded fabric ornaments if you would like to try your hand at doing it that way.
List of supplies:
1 1/2" Ribbon - It's up to you how many you want to use. I recommend a minimum or two. A dark and light or contrasting color. I prefer to use wire edged ribbon but it is not a necessity
Styrofoam ball- I have used 3" and 4"
Ruler- I used a seam gauge  but one of those clear true grid rulers would probably work great.
A ka-jillion straight pins. I would use the cheapest kind you have. They hold it together and you never see them. 
Scissors
Optional: 
Iron - To use if you are using non-wired ribbon
Charms
Fabric
Decorative pins
Cup - I used a regular Coffee mug to hold the ball while I worked on it. Other wise it rolls.
Glue - I didn't use any... Doesn't mean you can't.

Prep stuff:
If using 1 1/2" Ribbon, cut all of your pieces to 3". Now I haven't figured out the rhythm or reason for it but some ribbons are better at 2 7/8". This is not one of the parts you need to be crazy precise about. You need (8) 3" pieces for the centers of the ornament. You then need (16) 3" pieces for each layer after that. This covers both sides so DON'T double it.
For my example I am using a 3" ball with one layer. I am doing a shadow effect though so I am cutting out as many pieces as if I was doing two layers. The difference is the spacing between the pieces and the order that I place them.


Before I start, I cut out all of my pieces and form them into triangles, especially if the ribbon doesn't have a wire edge and I need to iron them.


Step One:
Your first step will be to form your center. Take 4 of the center pieces you cut out. I place my first pins on the inside of my triangle pieces. You can than fold back the flaps and your pin is hidden.


For your first triangle piece just pick a spot. This is the only one that is that carefree so ENJOY it.


Now add the remaining three pieces around the first.Using your ruler make sure Your lines match up. Think of these lines as the 8 points of a compass. If they are off or they get off later, you will be able to tell in the final product.
You can use fabric, a picture or whatever you want for your center piece. But your 8 points are crucial. You will have to mark them somehow if you use another method for your center.


Next You will be pinning down the ends of your triangle. Because you are pinning this to a sphere shape your ends will begin to overlap. This is okay and you can usually save a few pins in these steps just make sure your main lines near the center are straight. The ends will be covered by the next layers.


If you're going to add any embellishment to the center add it now. For the charms I added I threaded the charm onto a smaller ribbon that I cut longer than the box shape that was formed in the above step. Put pins at both ends of the ribbon and pinned it to the East and West points, (remember the compass). 


Step Two:
Now we begin the second layer. Take 4 of your second layer pieces. Put your first pin into the point like you did above. Pick a measurement... This is completely up to you and what you think looks good. For my demo I used a 1/2" measurement. The ornament with a "S" uses a 1".


Accurate measurements are everything. Even if you are 1/16th" off  you will quickly be able to tell. This ornaments beauty comes from its symmetry so try to keep your measurements the same along with your main compass lines straight. This is where the patience part comes in. Beauty of it though is you only have to take a few pins out to be able to fix the mistake.
 
For the shadow effect I mentioned about you will add your next layer or color atop the one before, before adding the next 4 pieces. The next layer is also only 1/8th of an inch away. In my mind I saw these two pieces as one even if I did have to add them separately.


If you don't want the shadow effect simply add the next 4 pieces of this layer.


I wanted to show what I meant by overlap, at the end of step one.  It gets worse the more layers you go. But its okay! This will all be hidden!


And TA-DAAAAAAAAAA you are finished with your first side. Now you just have to Rinse and Repeat...


Step Three:
Well... okay you have to mark the center of the other side before you can start pinning. I use a flexible measurement tape for this step. I measure all the way around and split that number in half, (in my case it was 4.75"). Placing one end on my starting point from the first side I measure out 4.75" and mark it. I try to get this measurement as accurate as possible so I do a few lines from different angles all starting from the same starting point. You now have your side two starting point. Follow steps 1-2 again.
Back of one of the above ornaments
Step Four:
Side two is finished. Now we get to cover the icky bottoms of our last layers. I am sure there are different methods for this also but this one is how I do it. I use two of the ribbons I used in my ornament and a extra smaller width one. I pre-measure the two wider ribbons to go around the ornament plus an inch. The smaller ribbon just needs to be long enough to form a loop wide enough to hang, plus two 1-2 inches.
  • Fold your smaller ribbon in half length wise.
  • Fold one of your wider ribbons in half width wise. Iron if it is not wire edged.
  • Line all the ribbon ends up and place a pin through them to keep them aligned. 
  • Find your North compass point of your ornament. Line up and pin your ribbon stack 1/2" to one side of this point.


Now treat each ribbon separately  The bottom most ribbon will be pinned straight down the center all the way around the ornament.  Leave a little bit of the end free we will finish it later. You could glue it here. I tried it and hated how it looked.


For the ribbon you folded in half, Pin down the inside of it, all the way around the ornament except the last little bit. Then fold the ribbon back over the pins.


The last part of this step is to make sure the ribbon loop is free and fold over the raw edges of the two other ribbons and pin.  Make sure this fold over line matches up with your North points or the ornament will hang lop-sided. These are also the only pins you can see on my ornament But if you don't like how that looks you can try glue. 

Step Five:
Hang on Christmas tree and Enjoy!


Monday, October 8, 2012

Autumn Dress


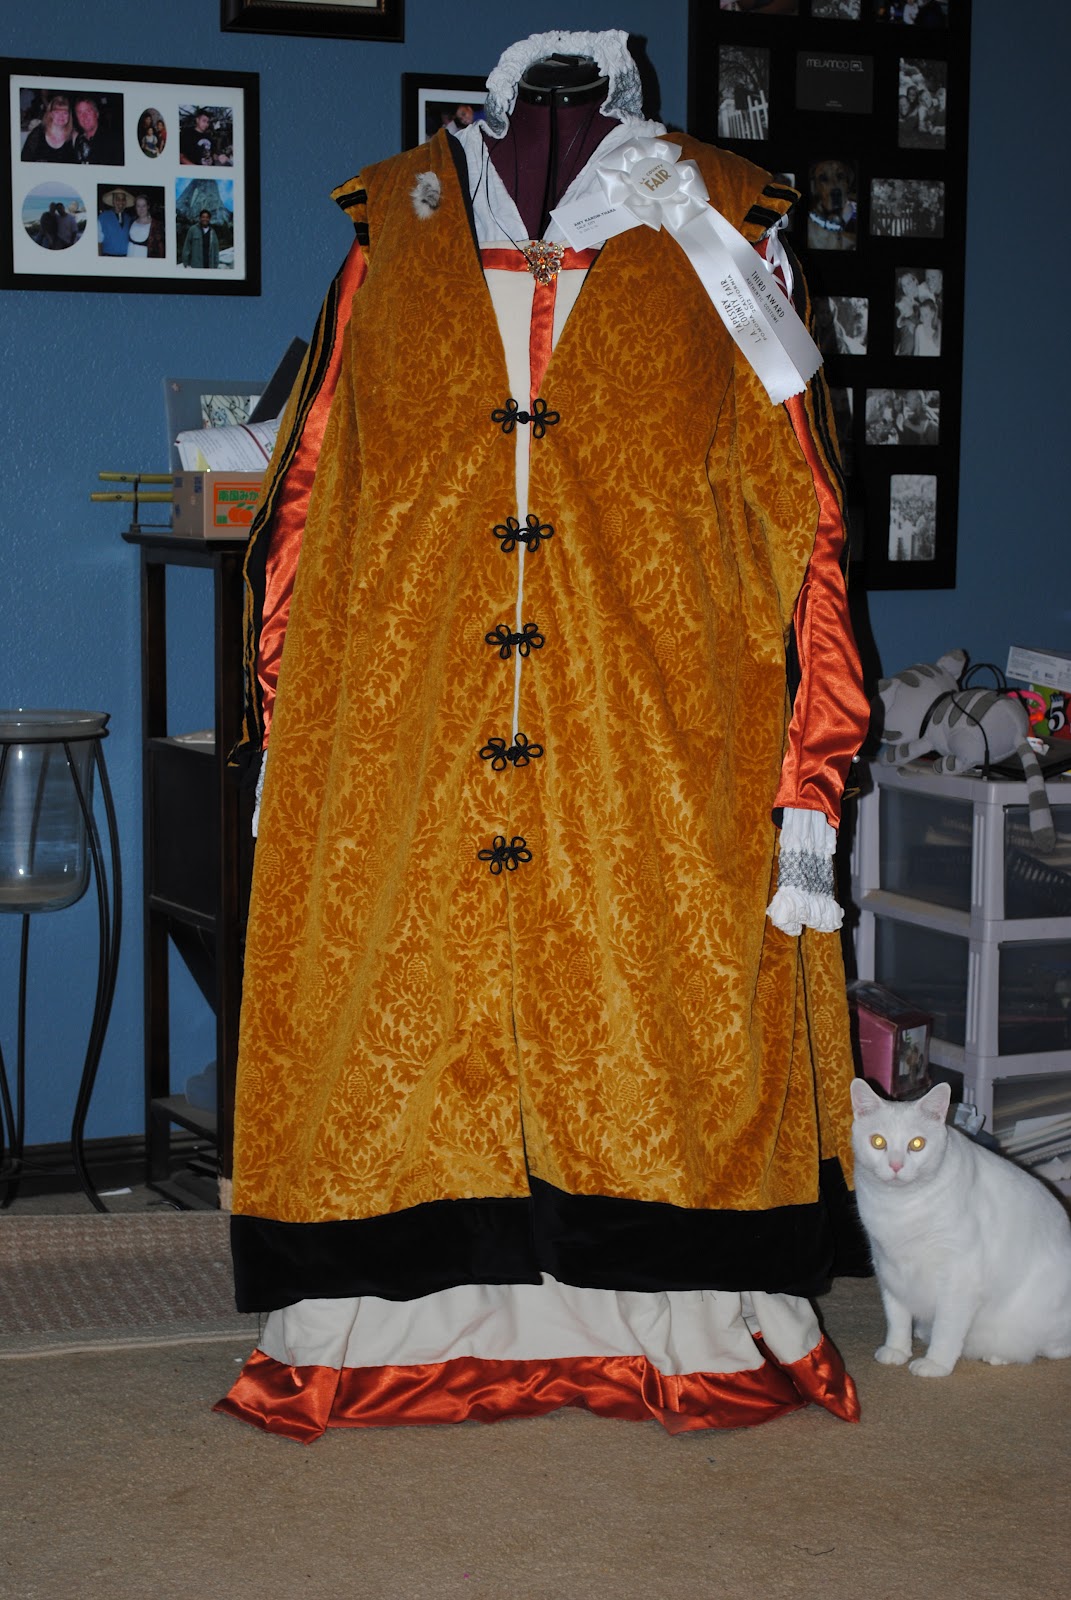
I have posted this costume before. But in lieu of this:

 I wanted to give a little of its back story. At this point in time, this costume is by far the one I am most proud of. It is also the one I have learned the most with. I have a HUGE list of  "What was I thinking!?!?!" moments with it. I was inspired to make this gown after looking at the book Vecellio's Renaissance Costume Book: All 500 Woodcut Illustrations from the Famous Sixteeth-Centry Compendium of World Costume by Cesare Vecillio; especially numbers 16, 18, and 208. 


 I knew at the time I did not possess the skill sets required to make the dress, but I was bound and determined to learn. For the first 2-3 years of this process I was trying to make this dress Elizabethan. Which I didn't even realize I was doing until my friend pointed it out to me. I am grateful she did though because after that point I was really able to make headway in completing the project. But to my defense when I started my only experience was limited to Renaissance faires and pretty much only Renaissance faires.
While I was in the "try to make it Elizabethan, but not" mode, I decided to make a hemp corded corset for a softer shape. While this method is something I would like to revisit at a later time, that particular corset was ugly as sin. It also did not work at all. I made the 2" opening in the front because I was hoping for ease of lacing it myself. But by doing this it provided no shaping at all and odd lumps and bumps. Lesson learned...

2 other pieces I put A LOT of work into but never ended up using were the forepart and sleeves.


They will not be going to waste though. Once I realized that I was trying to make the dress into an Elizabethan gown it broke into two dresses. My original inspiration and plan and an Elizabethan version.  The Elizabethan will have the same color theme and should be able to use some of the same pieces, (i.e. chemise and drawers). For now my first attempt pieces live in my UFO bin.
Construction details of what I ultimately ended up doing are:

For this gown I made a black worked chemise completely by hand. I used Patterns of Fashion 4: The Cut and Construction of Linen Shirts, Smocks, Neckwear, Headwear and Accessories for Men and Women C. 1540-1660 by Janet Arnold. I used the pattern for a shirt worn by Nils Sture.
For the Kirtle I drew inspiration from The Tudor Tailor by Ninya Mikhaila and Jane Malcolm-Davies. But the actual pattern I draped to get a proper, bust supporting, fit.
The over gown was made using Patterns of Fashion: The Cut and Construction of Clothes for Men and Women C. 1560-1620 by Janet Arnold, pages 122 and 123. I made some changes to the pattern so the gown would be able to close in the front.
After faire season this year, and being stepped on WAY to many times, I decided to go with the shorter length seen in the woodcuts. So it took over 4 years for me to go from:
this
to this
But I did! So I am very very happy!

First post about this gown. Better pictures of it on me but none of the final version.


Monday, September 24, 2012

Victorian Bathing Suit

Going to the beach in a historical costume has been on my Costuming Bucket List for sometime. So when I was invited to join a group planning to do just that, I jumped at the chance. 
I'll have to admit when I first started doing my research I only had a vague idea of what I wanted. I started out looking at old photos and fashion plates. Luckily I was able to quickly narrow down my search to 1920's or earlier because any later and I would be exposing to much skin for my liking. My everyday bathing suit is a pair or board shorts and a tankini, so the historical one had to cover at least that amount or I would be to self conscious to wear it. It might be the sailor in me but I also knew I wanted it to have a nautical flair to it. Yet I didn't want it to be the stereotypical image found everywhere when you put "Victorian Bathing Suit" into your internet search field.
 So when I stumbled upon this fashion plate I knew I had found the perfect one. The overlapping sleeves and pleated trim set it apart enough to make me happy but still had the nautical feel.
Once I had my inspiration photos I started with the undergarments. The Victorian era is completely new to me so I needed to start at the skin and work my way out. For the Chemise I used Laughing Moon Mercantile #100 Ladies' Victorian Underwear Pattern. I had everything I needed in my stash, and it went together incredibly fast. The corset came because of a discussion on the Live Journal Group CorsetMakers   which led me to these photos. 
1902 Bathing Corset Front
1902 Bathing Corset Back
This corset is later then my swimsuit by almost 20 years but I didn't feel the shape given would have changed that drastically for a bathing Corset. If I am wrong PLEASE let me know. I was instantly intrigued by this corset. It looks like a normal under bust except for the straps and then you see the back. Isn't that AWESOME!! 
I draped the corset on myself and then added the back pieces. If I was more concerned about waist reduction I would of done it differently but I wasn't, that's why I just draped it and pinched away excess material to get my shaped pieces.  I am still not completely sure how it would of fastened in the front. My Inspiration photos do not show that particular aspect. I ended up using a ribbon threaded through four of the holes, two in the back strap and two in the front.
(Once I get better pictures I promise they will be right here to show you what I mean!)
I asked the CorsetMakers group what their opinions were on how it closed and you can read here some of the comments and links they shared. I found the hook that went through the holes of the strap most likely but as of yet do not know how I would replicate it.
Turned out not to be as hard
 as I thought it would be.
Just a triangle piece sewn
 into the collars seams.
For the actual bathing suit I had to figure out if it was a one piece suit with an overdress or a dress with bloomers. I found several examples of the first option, or a one piece suit with a skirt over top of it. I still went with the dress with bloomers though. Even though I had no photos to support this I knew my capabilities as a sewer and knew I could drape the dress and pattern the extra pieces like the sleeves, collar and bloomers. The hardest part would be the collar and "V" insert. 
Deciding what fabric to use was a bit of a challenge. This is one of my weakest points in sewing. Knowing what a fabric is, and when or where to use it. I knew from my previous research that Wool was used most often. Thankfully a fellow Costumer let me know that she had used a tightly woven, even weave, light weight wool on her bathing suit. Yea for Fabric.com for having their awesome Wool sale at the same time! For the trim I decided to use a silk dupioni that I had in my stash.
I used a pinking blade for my rotary cutter, to cut long strips for the box pleats that I used as trim for the bottom of the bloomers and the skirt. The box pleats I measured each pleat pressed then moved on to the next one. Once I got into the groove of it it actually went by very fast. The skirts pleats are 1" wide and the bloomers are 1/2". For the bloomers I used my trusty Pajama Bottom pattern and just shortened it.


Accesories for this outfit:

The Hat/Bonnet is based off of this fashion plate.  I used a buckram blank from http://hatsupply.com/buckram.htm. The Pillbox bonnet on page 3 in fact, but I altered it. I took the crown completely off and widened the hole slightly. I also took off the outside wire so I could cut down the sides and then reattached the wire so it would keep its shape. I then covered it in the same silk dupioni that I used as trim on the bathing suit. I trimmed the bonnet in a dark blue ribbon. Personally I do not like the bonnet. It reminds me to much of a baby's bonnet which gives the whole outfit a 'big baby' vibe. I am hoping if I trim it a little more and curl/frizz my bangs it will look more like the fashion plate.


My shoes are Capezio Split sole Canvas flats. I attached ribbon to them, criss-crossing the top of my foot and then up my leg. The actual day of the event the straps would not stay up more than 2 seconds so they were cut off. Later it was suggested to me to use Elastic instead of Ribbon so I will try that the next time I wear them.

*Photos of me in the bathing suit were taken by http://koshka-the-cat.blogspot.com/ and http://www.afracturedfairytale.com/

Thursday, September 13, 2012

Updates almost complete

I still have a little more to go but it is at last looking like a site I can be proud of. 

  • Events I have been to and the flicker sets for ones I have pictures for are up. 
  • Current costumes have pictures and their status. I need to do write ups for my more recent ones and I think there are one or two more that need to be added.
  • Past costumes - *cringe* I have decided to add them. We all start somewhere. While I may not be proud of them now, I learned something with everything I have sewn. 
I like how much easier this is to update then the website. I am curious if it is as easy to find in searches as the the website is though....
YEA for change!

Monday, September 10, 2012

Lots of updates coming so please excuse the mess till its pretty again.

Thursday, June 28, 2012

Renaissance faires


Renaissance Faires I have visited
FAIRE                                         WHERE

Renaissance Pleasure Faire             S. California                   1998-2001, 2009, 2011-2012
Bristol Renaissance Faire                Bristol, WI                                               Aug. 2002
King Richard's Faire                       Carver, MA                                       Sept-Oct. 2003
Kansas City Renaissance Faire         Bonner Springs, KS                 Sept. 2003 & Sept 2004
Minnesota Renaissance Faire           Shakopee, MN                                         Sept. 2003
North Carolina Renaissance Faire    Raleigh, NC                                       March 27, 2004
The Escondido Renaissance Faire    Escondido, CA        April 3, 2004, Nov. 1, 2008, May 2, 2009
Sterling Renaissance Festival          Sterling, NY                                               July 2004
Vermont Renaissance Festival                VT                                                            2004
California City Renaissance Faire   Calif. City, CA                              October 2008, 2011 

We are in truth the people who use up all of our vacation time and much of our savings to attend Renaissance Festivals.
 We rise hours before dawn and travel hundreds of miles just to step back in time for a few hours.
 We are the people who lovingly work on our garb all year long until it matches the image in our minds eye.  In some cases our footwear may be more costly than the vehicles that we drive!
  We are the people surfing the web in the dark and dead of a winters night, trying to capture a little warmth out of a Renaissance site.
 We are the so called "grown-ups" who squeal like children when the parade goes by.
We are the men who, in our hearts, see ourselves as Knights, defending the virtues of chivalry and valor in a modern age so often lacking in honor.
We are the Wizards and the Fairies who insist that there is still some magic to be found in this tired old world.
We are the dedicated artisans who know that they must create with their hands in order to truly feel alive.
We are the performers who've forsaken the security of 9-5 for the pure joy of standing before a roaring crowd.
We are the kids, who've known all along that this is how life is supposed to be lived anyhow.
We are the bawdy Scots.  The carefree Gypsies.  The mischievous Goblins.  The naughty Wenches.
We are in short, the people, the Renfolk, the very lifeblood of the Renaissance experience.
    Masuggah the Trader - used with permission

A collection of old costumes....


Most of them are some of my first few. Moved over from my website.


My first two projects. The blue overgown on the left and my very first complete dress on the right.
                     
First costume piece I ever made for my then boyfriend now husband. Its a cape.

  
Trigun coat 


Renaissance Faire Garb

My brother and I in garb I made for the Escondido Renaissance Faire in 2004
Southern California Ren Faire


Other eras
Regency undies

Regency gown
Full length